Resizing and reducing/画像の縮小と軽量化
Application/アプリケーション
Use one of below. ImageJ is my recommendation, since I have developed macros for automatic resizing (2022.6). See "Automation" in this manual site, or Download macro files from GitHub. This page describes the procedures for resizing manually.
Photoshop can automate a wide variety of image processing with Actions and Batch. However, M1 max on Mac does not support multi-threading in Photoshop batch process (v23.2.1 M1 native, macOS 12.2.1, MBP16-2021, 2022-3-14 note). I strongly recommend to use ImageJ for the M1 series at present.
- ImageJ, Macro
- Adobe Photoshop, Action and Batch.
上記のどちらかを使います。ImageJがおすすめで、Macroが便利です。ImageJ macroを開発し、自動でResizeできます。自動化するMacroに関しては、上記リンクをご参照ください(2022.6)。全自動化の手順は別のページに記載しています。このページは、手動で縮小する手順について記します。ちなみに、ImageJは、2022年v1.53kから連続画像を扱うコマンドが増えたため、CoMBIの画像処理に使えるようになりました。
Photoshopは、アクション・自動処理・バッチで、多様な画像処理過程を自動化できます。ただし、MacのM1 maxは、Photoshop(v23.2.1 M1ネイティブ、macOS12.2.1、MBP16-2021、2022-3-14メモ)のバッチでマルチスレッドに対応していません。処理が何倍も遅くなるので、現状では、M1シリーズでは、ImageJ/FIJIを強くおすすめします。
Plan resizing/縮小の計画
The purpose of the resizing is to create a light series for registration, and also to create a grayscale image for 3D reconstruction. In addition, the pixel size is set to a convenient number to make it easier to handle.
The table shows an example, "A full-size image was taken with a Nikon D810 at approximately 1x magnification. Scale shows 4.88 µm/pixel". 4 types of reduced series are to be made. Reduce until pixels are less than 1000x1000 that can be used for registration. Actually, I am dealing with smaller images and less types of series, as images are often cropped before resizing.
Both color and grayscale series are usefull for 3D analysis. Color series is used for MPR and Segmentation, while Grayscale is mainly used also for volume rendering. Since grayscale is lighter, it is often used for heavier tasks; Image Stabilizer and Segmentation.
| µm/pixel | pixels | ||
|---|---|---|---|
| Original | 4.88 | 7360×4912 | color |
| Resized 1 | 5 | 7183x4794 | color, gray |
| Resized 2 | 10 | 3592x2397 | color, gray |
| Resized 3 | 20 | 1795x1199 | color, gray |
| Resized 4 | 40 | 898x599 | color, gray |
縮小の目的は、ズレ補正用の軽い連続画像をつくること、および、3D用のグレースケール画像も作ることです。ついでにピクセルサイズをキリの良い数値にして整理整頓しやすくしています。
表は一例で「Nikon D810でおおよそ1倍、フルサイズ撮影した。スケールを確認すると4.88µm/pixelだった」を示しています。4通りの縮小連続画像をつくることになります。ズレ補正で扱える1000x1000以下の軽いシリーズができるまで、縮小します。実際は、縮小の前にクロップすることが多いので、これらより小さな画像を扱っています。例のように縮小が4通りにもなることは稀で、通常は2通りか3通りです。クロップでは、標本ブロックの外周が残るようにします。
それぞれの縮小連続画像で、カラーもグレースケールも作ることが多いです。カラーシリーズは、MPRや、Segmentationに使い、グレースケールは、主にVolume Renderingに使います。グレースケールは軽いので、重い作業(ImageStabilizerやSegmentation)に利用することがあります。
Resize by ImageJ
Here is the procedure for manual resizing. Please see the other page for information on fully automatic resizing. 1. Prepare ImageJ, and setup. 2. record the operation, 3. Apply macro to serial image.
ここでは、手動で縮小する手順を示します。全自動縮小については別のページを御覧ください。ImageJは、まえもって基本設定しておきます。大まかな手順として、操作の記録と、連続画像の処理があります。
- (Preparation) Set memory size that ImageJ can use. 75% of on-board RAM is recommended.
Edit>Options>Memory & Threads...>Maximum Memory. Input as MB. Ex: RAM64GB, input 42GB(42000 MB). Restart ImageJ. - (Preparation) Set JPEG compression rate.
Edit>Options>Input/Output...>JPEG quality (0-100).100is recommended. For CoMBI data, image data size are reduced to 6% by95, 12% by100(Comparison with TIFF size). Image quality seems to be maintained. Do not use default value85, since it reduces data into 2.5% and also reduces the quality of images too much. - (Preparation) Refer a scale image and calculate pixel size (µm/pixel).
- (Preparation) Plan resizing. Calcutate image size (pixels). Recommand to use convienient numbers, such as 5, 10, 20, or 40 µm/pixel. Smallest series should have less than 1000 pixels.
- (Preparation) Create folders for storing resized series.
- Open one image.
- Start recoding Macro,
Plugins>Macros>Record. In the "Recorder" window, a macro file appear as "Macro.ijm.ijm"(default). Change file name as you like. -
Resize,
Image>Adjust>Size. Input pixel numbers. Check "Aspect reatio", Select "Innterpolation" asNone.Bicubicis not bad.Nonecreates shaper images. CheckAverage when reduction.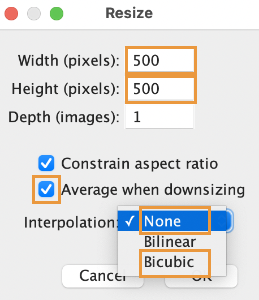
-
Crop (1). Cropped images contains the conture of the block.
- Use
Selecttool on the menu bar. Image>Crop
- Use
- Save macro file (.ijm) by
Createbutton > new window "Macro.ijm.ijm"(default name). - In the new window,
File>Save as. -
Close the image (no need to save), the window "Macro.ijm.ijm" and "Recorder".
-
Apply macro to serial images.
Process>Batch>Macro...The new window "Batch Process" appears. Input,Output. Select Input folder (original JPEG series) and output folder (empty). (Create folders in advance.)Openmacro file (ijm).Processbutton, to start.
- (準備、済んでいれば改めては不要です)ImageJ/FIJIが利用するメモリ量を決める。搭載メモリの75%が推奨最大値。
Edit>Options>Memory & Threads...>Maximum Memory。MBで入力、余裕を持って75%より少なめで使っている。64GBなら42GB(42000 MB)など。入力後、いちどImageJ/FIJIを再起動する - (準備、済んでいれば改めては不要です)JPEGの圧縮率を決めておく。
Edit>Options>Input/Output...>JPEG quality (0-100)。100をおすすめします。CoMBIの連続画像の場合、データ量はTIFF比較(フォルダの容量)で95で6%へ、100で12%へと減少し、画質は遜色ないかなといった程度です。デフォルトの85では、データ量が2.5%へとかなり減少しますが、画質はかなり低下します - (準備)スケール画像を参照して、ピクセルサイズ(µm/pixel)を計算する。
- (準備)縮小させる計画をたて、先のピクセルサイズを参考に縮小後のピクセル数(画像サイズ)を計算しておく。ピクセルサイズが、きりの良い数字になるように縮小している。例えば、5, 10, 20, or 40 µm/pixelの画像シリーズ。管理上便利だかです。最も縮小するシリーズは、一辺が500pixel程度になるようにしたい。のちのズレ補正をスムースに実行できるように。いくつものシリーズを作るときは、各シリーズ個別にマクロを記録するのがいいようです。
- (準備)処理後の保存先フォルダを新規につくっておく。
- 一枚だけ画像を開く
- Macroの記録開始。
Plugins>Macros>Recordウィンドウ「Recorder」(デフォルトでMacro.ijm.ijmとなっている。名称を変更してもよい。) -
縮小する
Image>Adjust>Size. 上記で計算しておいたピクセル数(画像サイズ)を入力する。Aspect retioを保つにチェックしてあれば、一辺の入力で済む。Interpolationモードは、Noneを推奨する(Bicubicでも悪くないが、NoneのほうがTIFFに近く、シャープに仕上がる)。チェックボタンAverage when reductionには、チェックを入れておく。 -
切り抜く(ブロック周囲がちょうど含まれる画像にしたい。すでに切り抜いてある場合は不要です。)
- メニューバーの左端、四角いアイコンを使って、切り抜きたい領域を選択します。
- 切り抜きます。
Image>Crop
- マクロファイル(.ijm)を保存します。
Createボタン。別ウィンドウ「Macro.ijm.ijm」が開く。(名称変更していれば、その名称が表示される) - その別ウィンドウ「Macro.ijm.ijm」がアクティブな状態で、
File>Save as。名前を決めて、拡張子.ijmのファイルを保存する。 -
画像を閉じる(保存する必要はない)。別ウィンドウ「Macro.ijm.ijm」も「Recorder」も閉じる。
-
いざMacroを実行し、連続画像を一括縮小します。
Process>Batch>Macro...ウィンドウ「Batch Process」が開かれる。 Input,Output入力フォルダ(元画像連続JPEG)と出力フォルダ(新規フォルダ、空、保存先)を指定。(ヒント:前もって出力フォルダを作っておくこと)Open保存しておいたマクロファイル(.ijm)を指定し、読み込むProcessボタン
Example of simple macro/マクロファイルの例
If you set the image size to 600x450 and Crop, you will get the following macro file (.ijm). In the macro file, Open, Close and Save are not required. These command can be specified when applying. 8 bit coversion(Grayscale) and other commands can be recorded in macro
画像サイズを600x450にして、指定の座標でCrop 切り抜きすると、下記のようなマクロファイル(.ijm)ができます。マクロファイルには開くや、閉じる、保存は記録不要で、それらは実行時に指定します。ここで例示したサイズ縮小や切り抜き以外にも、Grayscale変換なども記録して、CoMBI連続画像を処理できます。
run("Size...", "width=600 height=450 constrain average interpolation=None");
makeRectangle(181, 96, 278, 278);
run("Crop");
If you already cropped when RAW-JPEG conversion, and you don't need Crop in the ImageJ macro, the macro file becomes more simple, as below.
上記の例では、「縮小+切り抜き」でブロック周囲をぴったり含む画像にしましたが、もしRAW-JPEG変換時にすでに切り抜いている場合は、ImageJマクロでの「切り抜き(makeRectangleやCrop)」は不要です。その場合、下記のようなシンプルなマクロになります。これなら、Batchに手入力してもよさそうです。
run("Size...", "width=600 height=450 constrain average interpolation=None");
Tips/ヒント
-
Macro file do not require Open, Close, and Save. These are specified when applying.
Macro記録では、ファイルの「開く」、「閉じる」、「保存」は、不要です。一括処理を実行するときに保存先を指定できます。Photoshopとは異なるところです。 -
Before 2022, macro can't record
Save as. Thus, separated macros are needed for each resized series.
(2022以前のメモ)ImageJ Macroでは、別名保存を細かく設定できませんでした。作りたい画像シリーズが何個もある場合、(たとえば、5 µm/pixel series, 10 µm/pixel series, color series, grayscale series)、別々のマクロを組んだほうがいいようです。 -
After 2022.6.24, Fully automated process is available.
(2022.6.24) ImageJ Macroでも自動できるようになりました。縮小のフォルダ操作も含めて。 See Automation for detail. -
Photoshop Action can record various commands.
Photoshopの場合、別名保存もふくめ、複雑な作業を全部記録してくれます。 -
If you don't like to use JPEG, use TIFF. 3D slicer can open serial TIFF images. Icy accepts multi-TIFF format. Horos can't import TIFF.
JPEGを使いたくない場合は、TIFFにして画質が良いままで扱ってください。TIFF連続画像が読み込める3D再構築アプリは、3D slicerです。Icyはmulti-TIFF。HorosはTIFFを読み込めません。 -
Reference in Japan.
参考書:ImageJではじめる生物画像解析(学研メディカル秀潤社、2016)
Resize by Photoshop using Action and Batch
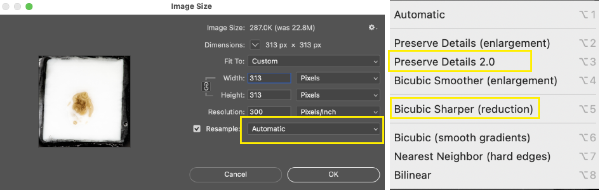
Prepare Photoshop. Set argorism for resizing Preference>General>Image Interporation>Bicubic sharper(best for reduction). Confirm before process. Hide "Home Screen" which interferes Action. Preference>General> Uncheck Auto show the Home Screen. If Home Screen ON, Close window in the Action close all windows including Action windows. Batch process doesn't support multi-thread of Apple silicon. MacBookPro-2021 M1 max takes double time than MacBookPro-2018 i9. CPU usage indicated that only a single core was working. Even if activating GPU process in Photoshop, M1 max processes slowly.
Photoshopの準備として、縮小時のアルゴリズムを設定します。Preference>General>Image Interporation>Bicubic sharper(best for reduction)。(反映されないかもしれないので、実行前に要確認)。また、ホーム画面を開かないようにしたほうがActionの操作で都合が良いです。Preference>General> Uncheck Auto show the Home Screen。チェックを外しておきます。デフォルトではホームページが開くようになっており、ActionにClose windowを記録すると、Actionを含めたすべてのウィンドウが表示されなくなってしまい、不便です。ActionのBatchにおいて、MacBookPro-2021 M1 maxは、MacBookPro-2018 i9よりも、処理が倍ほど遅いです。CPU usageをながめると、どうやらマルチタスクにならないようです。対策は分からず、PhotoshopのGPU処理をON/OFFしても変わりませんでした。
- (Same as 3-5 in ImageJ. Refer a scale, plan, and create new folders.)
- Call Action window from
Window>action. Create a new actionWhite paper mark. -
Start recording in
Action.Red circleindicate recording.- Resize (1)
Image>Image Size.... Confirm resampling mode asPreserve Details 2.0orBicubic Sharper (reduction).
Save as. (Color series, compression ratio10, specify folder.)- Convert to grayscale,
Image>Mode>Grayscale Save as. (Grayscale series, compression ratio10, specify folder.)- Repeat above steps for Resize (2), Resize (3)...
- Stop recording
Squerebutton.
- Resize (1)
-
Apply Action.
File>Automate>Batch...Specify action and folders containg original image series.
-
スケール画像で、ピクセルサイズを計算する。Refering to the scale image taken beforehand, caliculate the pixel size of the original blockface image in micrometer/pixel.
-
縮小させる計画をたて、1のピクセルサイズを参考に縮小後の画像サイズを計算しておく。ピクセルサイズが、きりの良い数字になるように縮小している(のちの3Dイメージングに便利)。最小は一片500pixel程度になるように計画する(のちのズレ補正では、軽い画像シリーズから試す)。のちのズレ補正に Cariculate the reduced image size to make 5, 10, 20, or 40 µm/pixel image series.
-
新規フォルダを必要数作成する。縮小した画像シリーズを保存するため。
-
Actionに記録する。作業ウィンドウが出ていなければ、Window>actionで表示させる。新規アクションを白い紙のマークで新規アクションを作成する。名称はデフォルトでも変更しても、あとで利用するときに分かれば良い。記録が始まっていれば、赤い丸が表示されている。記録できるのは、画像縮小1種目、別名保存、グレースケール、別名保存、もとに戻す、画像縮小2種目、閉じるなど、さまざま。記録を停止するときは、四角ボタン。- 画像縮小1
Image>Image Size...Resamplingモードは、Preserve Details 2.0またはBicubic Sharper (reduction)を選ぶ。
- 別名保存(カラー画像、JPEGなら圧縮率
10。TIFFでもよいがデータ量が多いのでディスクに十分な空きを。) - グレースケールへ変換。
Image>Mode>Grayscale - 別名保存(グレースケール画像)
- 画像縮小2(縮小1と同様に、Image Size、別名保存、Grayscale、別名保存)
- アクションを停止する
四角ボタン。
- 画像縮小1
-
いざ連続画像を一括して縮小。
File>Automate>Batch...記録したアクションと、実行させたい連続画像入りフォルダを指定し、実行する。
Resizing by Photoshop using Droplet
Action can be save as external file, Droplet. Droplet is useful when you want to use the same processing for different experiments. Droplet can be used in different computer, indipendent from Photoshop.app.
Batchとは別に、Dropletというやり方もあります。記録したアクションをドロップレットファイルとして保存して、画像のサムネイルにドラッグします。結果は同じです。Dropletは、単にアクションを保存しておく目的でも使えます。別の実験で同一処理をかけたいときや、別の人のコンピュータで同一処理をしたいときに利用できるでしょう。
- (Record action as above.)
- Create droplet.
File>Automate>Create Droplet… - Save Droplet In,
Choose...specify name and folder. - Play, Set:, Action: Confirm to specify action you want.
OK- Drople file has extension
.app - Drag and drop a folder containing serial images, on the droplet icon.
- (上記のアクションを記録するところまでは同じ)
- 作ったアクションをファイルとして保存する
File>Automate>Create Droplet… - Save Droplet In,
Choose...より、保存先と名称を指定する - Play, Set:, Action: 作ったアクションが指定されているか確認し、
OK- 拡張子
.appのdropletファイルが指定した場所にできる - 処理したい連続画像が入ったフォルダを、ドラッグして、ドロップレットファイルに重ねる(アイコンに重ねる)
Tips/ヒント
If you recorded Save as in the action, resized images are saved in the specified folder. If you want to change folder, delete a line Save as in the original Action, and record again with different folder. Then, create a modified Droplet again.
保存先までアクションに入れておくと、特定のフォルダに縮小後ファイルが保存されます。もし、別の実験で同一処理をかけたいときは、別の保存先に変更したいところです。そんなときは、作ったアクションの中の、保存先を指定した一行を削除し、新しい保存先を追記録します。改訂したアクションからDropletをあらためて作ります。
Reduce the number of images/軽量化_枚数を減らす
If you select images from image series by skipping one image, you can reduce the data size by half. When you cut too thin and the number of images has increased too much; when you do not need so many images for analysis; when you want to lighten the weight of 3D analysis.
連続画像を1つ飛びにすれば、容量が半分になる。薄く切りすぎて、枚数が増えすぎたとき。解析にはそんなに枚数はいらないとき。3D解析で軽くしたいとき。
For macOS
Duplicatea folder containing serial images.- Open duplicated folder in
Finder, make window long vertically and narrow. SelectShow items as icons, Sort byname. - Adjust Finder width to display icons in 2 colomn.
- Select only 1 colomn using mouse.
Right click>New Folder with Selection. If you make 3 colomn, data is reduced by 1/3.
- 連続画像を含むフォルダを複製する。フォルダ上で右クリック、
Duplicate - 複製したフォルダを
Finderで表示し、タテに細長く表示する。Show items as icons, Sort byname。ファイル名で並べ替えをする。 - 2列になるように、Finderの表示幅を調整する。
- マウス・トラックパッドをつかって、片方の列のファイルだけ選択する。
- 右クリックで、
New Folder with Selection、フォルダに名前をつけて管理する。(または、選択ファイルを削除して、残りを使用するのでもかまいません) 同様に、3列になるように表示して、1列だけを選択すれば2つ飛ばしのシリーズ(枚数3分の1)も作れます。
For Windows OS:
- Duplicate serial images.
Right clickon the folder andCopy&Paste。 - Open duplicated folder and show as icon (any size).
- Adjust window width to display icons in 2 colomn.
- Select only 1 colomn using mouse.
- Delete selected colomn (images).
- Remaining images are used as "reduced series".
- 連続画像を複製する。フォルダ上で右クリック、
Copy&Paste。 - 複製したフォルダを開いて、アイコン表示にする(大、中、小アイコン、どれでも)
- ウィンドウの幅を狭くして、2列で表示する。
- 片方の列のファイルだけ選択する。
- 選択したファイルを削除。(複製フォルダ内であること。元の連続画像とは別であること)
- 残ったほうを1つ飛ばしの連続画像として使用できます。
File name Batch conversion/ファイル名一括変換
File name batch conversion is done when there are special circumstances, such as filenames reverting from 9999 to 0001 at the middle of imaging. ImageJ's Image Stabilizer requires sequential numbers at the beginning of file names, whereas Photoshop's batch processing does not require sequential numbers, as long as the all images in a folder will be processed anyway. 3D slicer requires a complete sequential number (center column of the table). In case that the original filename is left behind the sequential number (right column of the table), 3D slicer will not recognize it as a serial image. When you change the numbering to complete sequential numbers, leave a note in the experiment notebook so that the original file names can be matched (so that the experiment can be reproduced). Just for information, Horos accepts both complete serial name (center column) and serial number plus original name (right column).
| Original name | Compatible for 3D slicer |
Uncompatible for 3Dslicer, but compatible for Horos and ImageJ |
|---|---|---|
| DSC_9997.jpg | 0001.jpg | 0001_DSC_9997.jpg |
| DSC_9998.jpg | 0002.jpg | 0002_DSC_9998.jpg |
| DSC_9999.jpg | 0003.jpg | 0003_DSC_9999.jpg |
| DSC_0001.jpg | 0004.jpg | 0004_DSC_0001.jpg |
| DSC_0002.jpg | 0005.jpg | 0005_DSC_0002.jpg |
| DSC_0003.jpg | 0006.jpg | 0006_DSC_0003.jpg |
- Windows OS:
Explore,Select multiple files,Rename. "Input-char+(1).jpg" will be created. Original fileneme will be lost. - Mac OS: :
Finder,Select multiple files,Right click, sub-menu,Rename. For customize in some extent, use pull-downFormat, and following pull-downName and Counter. -
Adobe Bridge (Paid app) can custamize file names in any style you like.
撮影中にファイル名が9999から0001に戻ったとか、特別な事情があるときに、ファイル名を一括で変換する。CoMBIの撮影が通常に成功した場合は、必要ない。ImageJのImage Stabilizerでは、頭に連番が必要です。Photoshopによる連続画像処理では、フォルダ内にあれば一括して処理してくれますので、連番は必要ありません。3D slicerの場合、完全な連番(表の中央列)が必要である。連番のうしろに元ファイル名を残した場合(表の右列)、3D slicerは連続画像とは認識しない。完全な連番に変更しても、元々のファイル名と照合できるよう(実験が再現できるよう)、実験ノートにメモを残す。ちなみに、Horosの場合、頭に連番さえあればよく、元ファイル名も残したスタイルが使える。
Windows OSやmacOSの組み込み機能で変換できる。Windowsの場合、Exploreで、複数選択Select multiple files、名称変更Renameすると、「入力文字(1).jpg」と、カッコつき連番数字になる。元のファイル名は残らないので注意する。Macの場合、Finderで、複数選択Select multiple files、右クリック(副メニュー)Right click, sub-menuより、ファイル名を変更Rename。完全変更や連番追記など、ある程度カスタマイズできる。プルダウンメニューのFormat, 次のプルダウン、Name and Counterを使う。もし、Adobe Bridge(有料アプリ)があれば、細かく設定ができる。